Getting Started with WASM Using Rust and ParcelJS
By Justin Jordan — — 7 min read
I'll show you an easy way to start using WASM with Rust and ParcelJS without having to deal with complex compilation or writing abstractions in JavaScript.
TL;DR — Here’s the code.
Learning how to use WASM has a steep learning curve. If you’ve never written compiled languages before, like C or Java, you may have a difficult time figuring out how to even get started. Just getting things compiled sometimes requires you to write a whole compilation system of scripts and make files—a whole other layer to an already complex development process. Call me crazy, but I feel that if your configuration is larger than your actual code, there’s a serious problem. There has to be a better way… [brace yourself for segue]
Enter ParcelJS
ParcelJS, if you’re not familiar, is a zero-configuration bundler, and it does it super well. The simplest way to start using it is to create an entry point, like index.html, and get Parcel bundler running with parcel index.html. It will serve your app, rebuild on change, and install packages automatically as you import them. That’s right! It will watch your code and run npm install automatically for anything that isn’t already installed, all in the background. I’m sorry, but the fact that more developers aren’t using Parcel for just this feature alone blows my fricken mind!
Parcel supports several different file types, and it will install any dependencies needed for them to run seamlessly. This means you can include things that generally require compilation, like vue or scss files, and it JUST WORKS! There’s support for all kinds of files, but the ones we’re particularly interested in are Rust files. Parcel imports Rust files like they were regular ES modules, handling all the WASM compilation and bridging for you behind the scenes. So you don’t even have to touch a compiler to start using WASM. I can hardly contain my excited right now!
Let’s Get Started!
For a basic example, we’re going to be creating a simple web app that sums all the prime numbers less than or equal to a thousand. We’ll use Rust/WASM to handle the computation and Javascript to call it. Fun, right?!
You’ll need to install a few things if you don’t have them already—Node and Rust. I’m assuming you already have Node installed, but if you don’t (How?), I recommend using Node Version Manager (NVM), which is good for installing Node and changing versions on the fly. To install Rust, go to Rustup.rs and follow their instructions.
Create the Project
First we’ll create a new project directory, initialize it as an NPM package, then install ParcelJS. You can do all of this with the following commands:
$ mkdir my-wasm-project
$ cd my-wasm-project
$ npm init -y
$ npm install --save-dev parcel-bundler
You could install Parcel globally, but I personally prefer to install it to the project, so as it passes hands, everything needed for the project is included in the package and lock file.
Make the Entry Point
Create a file called “index.html” with some basic HTML boilerplate. We just need some simple markup for this tutorial. You can use the following:
<!DOCTYPE html>
<html lang="en">
  <head>
    <meta charset="UTF-8" />
    <title>Getting Started with WASM Using ParcelJS and Rust</title>
  </head>
  <body>
    <!-- includes will go here -->
  </body>
</html>
Next we’ll create a NPM script to run our project. Add this start script package.json file:
{
  "scripts": {
    "start": "parcel index.html"
  }
}
Great! We now have the beginnings of a ParcelJS app. Let ‘er rip with the following command:
$ npm start
You can view your app with live reloads by going to http://localhost:1234 in your browser. Parcel will take care of managing your package dependencies in the background.
Coding Time
We’re going to make our Rust file, which will be the meat and potatoes of the app. Create a file called “functions.rs” and add the following code:
pub fn isPrime(num: i32) -> bool {
    if num == 2 {
        // 2 is prime
        return true;
    } else if num % 2 == 0 {
        // evens aren't prime
        return false;
    } else if num <= 1 {
        // negatives, zero, and one aren't prime
        return false;
    }

    // Brute force the rest,
    // But stop at square root because math!
    let max = (num as f32).sqrt().ceil() as i32;
    for i in 2..=max {
        if num % i == 0 {
            return false;
        }
    }

    true
}

#[no_mangle]
pub fn calcPrimeSum(max: i32) -> i32 {
    let mut sum = 0;

    for i in 0..=max {
        if isPrime(i) {
            sum += i;
        }
    }

    sum
}
If some of that makes no sense to you, don’t feel bad. I wrote it and some of the Rust syntax still looks weird to me! Here’s a basic breakdown:
isPrimeis a function that does exactly what you think. It returns true if a number is prime, or false.calcPrimeSumis also a function that loops through all the numbers up to the provided max value, adding the numbers to the sum if they’re prime.- Make note of #[no_mangle] above the calcPrimeSum declaration. This bit preserves the function name in the WASM binary, so it can be called via Javascript. Be sure to add this to any functions you’d like to have access to.
Import Rust
Here’s the best part! We’re going to import our Rust file via Javascript and run our calculation. To fully appreciate this, I advise you to open a new tab and search for how this is done normally without Parcel. Don’t worry, I’ll wait…
Looks complicated, right?! Compiling, importing, and actually using WASM typically requires so much code. Well our code is going to be much simpler. Make a file called “main.js” or whatever you prefer, then add a couple lines:
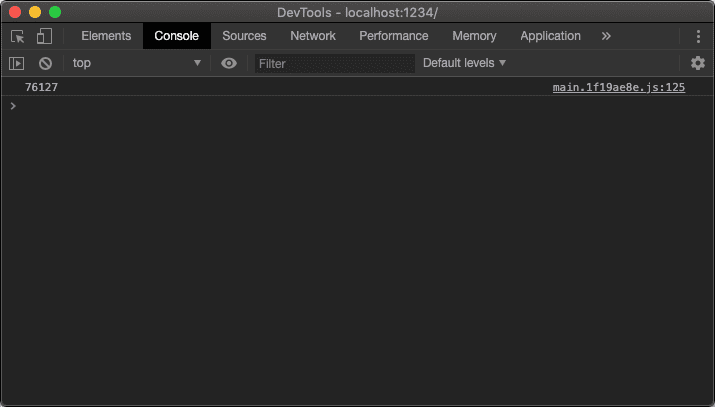
import { calcPrimeSum } from "./functions.rs";

console.log(calcPrimeSum(1000)); // outputs 76127
That’s it! Like I said before, loading Rust files is as simple as loading a ES module. You simply import your functions and use them like normal Javascript.
Add to Entry Point
With all the code in place, this leaves only one thing left to do. With the Parcel bundler still running, include your main.js file in index.html:
<body>
  <p>See the console!</p>
  <script src="./main.js"></script>
</body>
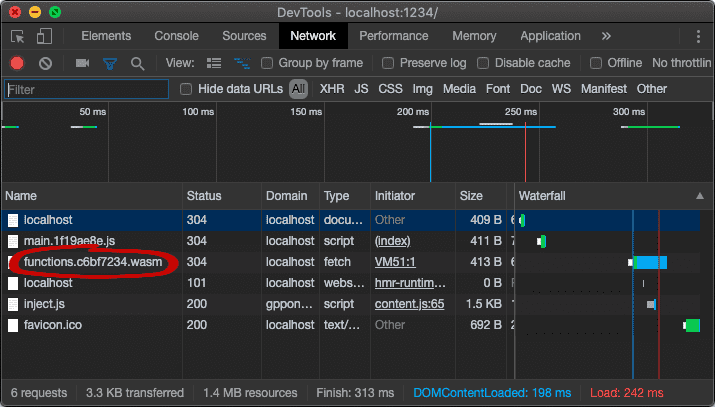
If all goes according to plan, when you save this file, Parcel will compile the Rust into WASM and reload the page. If you’re not seeing any terminal errors and 76127 is printed in your browser console, then congratulations! You’re officially a WASM developer! Just for proof, pop open the network tab and you should see a .wasm file in there somewhere. Pretty rad, right?!
Let’s Wrap Up
For simplicity sake, we didn’t create any UI, but I’m sure you can see how incorporating Rust and WASM isn’t much harder than ordinary Javascript. But here’s some things to keep in mind as you go off to experiment more with this on your own.
Types Are Tricky In this tutorial, we only passed numbers to our Rust function. It’s possible to pass different types like strings and objects; however, this is much more complicated and requires more labor. Rust and WASM are strongly typed, so you can’t just pass any values and expect type conversion to happen automatically. You’ll have to help it out. This is outside the scope of the tutorial, but there’s documentation and other tutorials out there that can help you tackle this problem.
Did We Need WASM? It should be noted, this application didn’t really require WASM, since Javascript could handle this same task just as efficiently, if not more so, on its own thanks to the JIT compiler. But this tutorial hopefully gives you the basic building blocks to create some crazy, computation heavy application, like a compression algorithm or a video filter—both examples of applications that could benefit from WASM.
Thank You Anyways, thanks for reading and I hope you got something from this. Now go make something awesome!
For example code, go here!